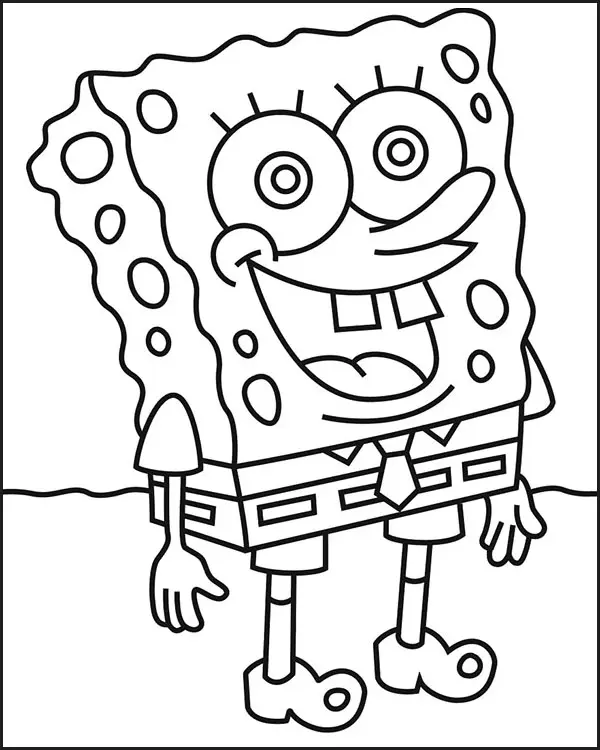
Drawing For Kids is typical for something to be trendy for a few years before people move on to the next trend. Spongebob Squarepants is everyone’s favorite sea sponge, but sometimes popularity never seems to disappear.
| Hairdresser Bermondsey |
| Hairdresser Tower Bridge |
| Restyle haircut London Bridge |
| Salon London Bridge |
Simple SpongeBob Drawing
Since 1999, this pleasant sponge has delighted audiences of all ages, and he shows no signs of slowing down! Drawing For Kids tutorial is for you if you’ve ever wanted to learn how to draw the adorable sponge.
You may have fun learning to draw this vibrant figure with the help of this step-by-step tutorial on how to draw Spongebob in 8 simple steps!
Step By Step Drawing
1:
- With this drawing tutorial, we’ll start with Spongebob’s eyes and nose to get things started. Starting with his nose, it is fairly long and gradually slopes upward.
- The left eye can be added to match the image after you’ve drawn it in. Draw the most accurate circle you can by starting from the nose.
- As the other eye will intersect there, make sure to leave a small space on the right-hand side of the eye.
- The right eye should next be carefully drawn in. However, leave a space below the eye on the right, and then create a curving line for his cheek.
- Finish this step by drawing three lines for his eyelashes on top of each eye.
2:
- Draw in his mouth and cheek in step two.
- Since Spongebob hardly has a serious expression, we’ll include one in this step of your Spongebob artwork.
- Make a short, curved line that descends from his nose first. Before making a sharp right bend into another curving line that continues under the cheek, it should be brief.
- Once that line is made, add two square shapes to create his recognizable teeth. Then, from the teeth to the corner of his mouth, draw a curved line underneath it to complete the drawing. Don’t forget to attach a tongue to him!
- The last stage in this process is to outline the remainder of his cheek and add three dots representing freckles. He will have a chin if there is a curved line under his mouth.
3:
- At this point, you can begin to outline his physique.
- Since the face is finished, we will start drawing Spongebob’s body in this section of our drawing tutorial.
- Spongebob is more of a 3D rectangular shape, despite having the word “square” in his name. Draw a rectangle around his face as you see it in the reference image for the time being.
- You can also see that you need to use a wavy line since Spongebob’s lines aren’t entirely straight.
4:
- Increase the size of his physique and his tie.
- Give Spongebob his shirt and tie to begin this round of artwork. The tie will stretch from the bottom line of his torso and be made up of triangular and circular forms.
- Once you have that, you can draw in the body’s side section as it appears in the illustration. To accommodate his arm afterward, leave a smooth, curved gap at the side.
5:
- Give Spongebob his shirt and pants in the fifth step.
- Spongebob needs to be dressed up now. Let’s start with his shirt’s arms. A few curved lines will be used to create these.
- The left arm will extend directly from his torso, while the right arm will fit into the gap you previously left.
- Then, you can create his pants by forming a rectangular shape using straight lines. Unlike the lines on his body, these lines will be straight.
- You can move on after drawing more curved lines for his pant legs.
6:
- Draw Spongebob’s limbs.
- Your Spongebob illustration looks fantastic! Let’s give him some limbs in this phase of our tutorial on how to draw Spongebob.
- His arms appear to be straight lines with curved lines for fists since they are so straight in the air.
- To depict him running, the left leg will be extended straight out, while the right leg will be curled. You can create his shoes using curved and straight lines, as shown in the reference image.
7:
- After that, add a few last details.
- The last stage of your Spongebob drawing is almost here! Let’s add a few more details before we proceed to the coloring stage.
- As seen in the image, he uses straight lines to separate his shirt from his slacks. Then, you can use a pattern made of thick but tiny black rectangles to reveal his belt.
- Add a few lines above his shoes to indicate his socks, if necessary.
8:
- Add coloucoloromplete your Spongebob drawing.
- Spongebob looks fantastic in your drawing, so now you can enjoy coloring him.
- Spongebob has a recognizable yellow coloring, and the illustration demonstrates how using various yellow hues on various body parts will help give him depth.
- What entertaining art mediums are you going to use to draw Spongebob? I would use acrylic paints because they give colors that are ideal for Spongebob a nice, vibrant look.
- But that’s only one approach; we can’t wait to see what hues and supplies you employ to complete this!